Handprint Bald Eagle Craft

This handprint bald eagle craft is one of those easy preschool crafts that works for almost any theme. Patriotic units, bird studies, fine motor practice, American symbols. Whatever you are covering, this one fits.
Kids ages 3 to 7 trace both hands to create the eagle’s wings, then cut, glue, and assemble the rest from colored cardstock. The result looks impressive, but the process is simple enough for preschoolers to follow with light adult help on the glue gun.
Start to finish, plan for about 30 minutes. Grab the supply list below and let’s get started.

Handprint Bald Eagle Craft
A handprint bald eagle craft is a simple preschool bird activity made with cardstock, handprint wings, and basic craft supplies. This patriotic craft helps preschoolers practice fine motor skills, cutting, and creative expression while making an eagle using their own handprints.
Supplies Needed for This Handprint Bald Eagle Craft
Before you get started, gather these supplies:
- Colored cardstock or construction paper
- Wiggle eyes
- Scissors
- Glue sticks
- Crayola Bold & Bright markers
- Printable eagle template (click the “click here” button at the end of the post)
How to Make a Handprint Bald Eagle Craft
Step 1: Prepare Your Pieces
Print and cut out the eagle template. Using a pencil, trace the head and tail feathers onto white cardstock, the beak and talons onto golden yellow cardstock, and the body onto brown cardstock. Trace both hands onto brown cardstock for the wings.

Step 2: Cut Out All Pieces
Cut out each piece with scissors. Cut just inside the traced lines for a clean, finished edge.
Step 3: Assemble the Body
Using a glue gun, attach the head to the top front of the body. Glue the tail feathers to the bottom back of the body.

Step 4: Add the Wings
Glue one handprint wing to each side of the body, positioning them so the fingers spread outward like a soaring eagle.

Step 5: Add the Beak and Talons
Glue the beak onto the front of the head. Glue the talons to the bottom of the body.

Step 6: Attach the Eyes
Press two wiggle eyes onto the eagle’s face with glue. If using liquid craft glue, allow extra drying time before moving the finished craft.

Step 7: Finish with the Nostrils
Use a black permanent marker to draw two small nostrils on the top of the beak. Your handprint bald eagle is complete.

Ways to Use This Eagle Craft
This eagle looks great once it is finished, and there are plenty of places to put it to work.
Classroom decorations. Line a windowsill or hallway with a full class set for an eye-catching patriotic display.
Patriotic bulletin boards. Display it alongside other American symbols for a Fourth of July, Veterans Day, or Presidents Day board.
Homeschool displays. Add it to a nature or bird unit wall to give kids a visual reminder of what they have been learning.

Tara’s Tips:
⭐ Library Pairing: Read Bald Eagle by Gail Gibbons before making this handprint eagle craft to build background knowledge about America’s national bird.
⭐ Display Idea: Line up a full class set of finished eagles across a bulletin board with the title “Soaring into Summer!” for an easy patriotic display.
Extend the Learning
This craft pairs well with a broader unit on birds, nature, or American symbols. Here are a few simple ways to keep the learning going.
Read Books About Eagles
Pull one of these titles before or after the craft to build vocabulary and background knowledge:
- The Eagles Are Back by Jean Craighead George
- The Nature Kid’s Guide to Bald Eagles by David Anderson
Learn About American Symbols
Use the finished eagle as a jumping-off point for a short conversation about American symbols. Talk about what makes the bald eagle the national bird, why the U.S. flag looks the way it does, and what patriotic holidays your family or class celebrates throughout the year.
Compare Birds
Lay out a few bird photos and ask kids to compare what they notice. Feathers, wings, beaks, and habitats are all great starting points. Preschoolers can sort birds by size, color, or where they live, turning a simple craft day into a full science discussion.

Grab Your Free Eagle Template
Ready to make your own handprint bald eagle? Grab the free printable template below and get started today. All the shapes are included so you can skip the freehand tracing and get straight to the fun.

Handprint Bald Eagle Craft
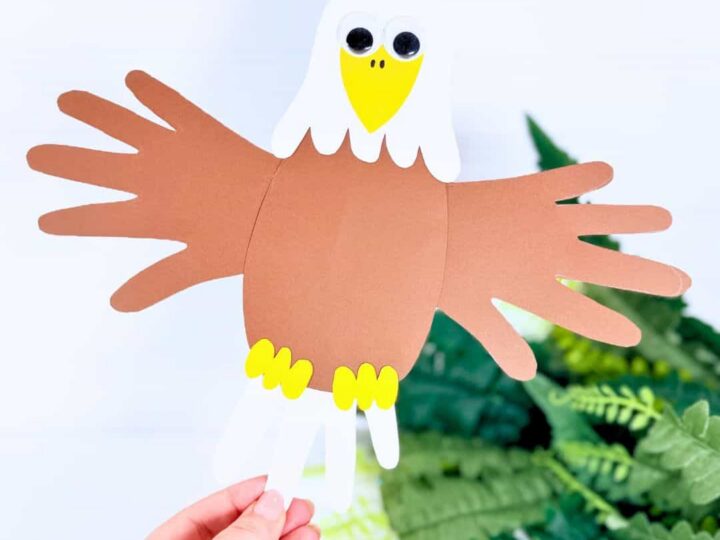
Make a handprint bald eagle craft using colored cardstock and wiggle eyes. Kids trace both hands for the wings and assemble the pieces into a majestic paper eagle in about 30 minutes.
Materials
- Brown cardstock
- White cardstock
- Golden yellow cardstock
- Wiggle eyes
- Scissors
- Pencil
- Glue gun and glue sticks
- Black permanent marker
- Printable eagle template
Instructions
- Print and cut out the eagle template. Trace the head and tail feathers onto white cardstock, the beak and talons onto golden yellow cardstock, and the body and handprint wings onto brown cardstock.
- Cut out all pieces just inside the traced lines for a clean, finished edge.
- Glue the head to the top front of the body and the tail feathers to the bottom back of the body.
- Glue one handprint wing to each side of the body with fingers spreading outward.
- Glue the beak onto the front of the head and the talons to the bottom of the body.
- Press two wiggle eyes onto the eagle's face with glue.
- Draw two small nostrils on the top of the beak with a black permanent marker.

Tara is the brains behind Homeschool Preschool, where her journey from preschool and public school teacher to homeschooling mom of three fuels her passion for early childhood education. With a blend of expertise and firsthand experience, Tara’s writings offer practical tips and engaging resources to support families in creating meaningful learning adventures at home.


