Paper Plate Zebra Craft for Preschoolers

Paper plate zebra crafts are a simple way to combine creativity and learning in the preschool classroom or at home. If you’re looking for preschool zoo theme activities, this easy craft is a great addition to your lesson plans.
Using a paper plate and a few basic craft supplies, children can create an adorable zebra while practicing important fine motor skills. As they cut, glue, paint, and assemble their craft, they’ll also learn more about zebras and other zoo animals.
Whether you’re planning a zoo unit, a safari theme, or letter Z activities, this paper plate zebra craft is an easy hands-on project preschoolers will enjoy making.

How Do You Make a Paper Plate Zebra Craft?
A paper plate zebra craft is an easy preschool animal activity made with a paper plate, construction paper, paint, and googly eyes. Children decorate the plate with zebra stripes and simple facial features to create a cute zebra while practicing fine motor skills, creativity, and hand-eye coordination. This craft is perfect for zoo themes, safari units, and letter Z activities for preschoolers.
How to Make a Zebra Craft for Preschoolers
This zebra paper plate craft comes together with just a few basic supplies and is easy enough for preschoolers to make with minimal assistance. Follow the step-by-step directions below to create a cute zebra that’s perfect for zoo themes, safari units, or letter Z activities.
Supplies Needed
Gather these simple supplies before getting started:
- Black marker
- White paper plate
- Black acrylic paint
- Paintbrush
- Black construction paper
- White cardstock or construction paper
- Pink construction paper
- Large googly eyes
- Scissors
- Glue
- Zebra template (click the “click here” button at the bottom of this post)

Directions
Step 1: Prepare the Pattern
Download and print the zebra template. Cut out the pattern pieces, then trace the zebra stripes onto the left and right sides of the paper plate with a pencil.

Step 2: Paint the Stripes
Paint the traced stripes with black craft paint. Allow the paint to dry completely, then apply a second coat if needed.

Step 3: Trace the Remaining Pieces
Trace the muzzle and mane onto black cardstock. Trace the outer ears onto white cardstock and the inner ears onto pink cardstock.

Step 4: Cut Out the Pieces
Cut out all of the traced pieces. Then carefully cut small slits into the mane piece to create a fringed effect.

Step 5: Assemble the Ears and Mane
Glue the pink inner ears onto the white outer ears. Attach the ears to the top of the paper plate and glue the mane between them.

Step 6: Add the Eyes
Glue two large googly eyes to the center of the zebra’s face.

Step 7: Attach the Muzzle
Create rosy cheeks by stamping pink paint on either side of the muzzle. Once dry, glue the muzzle to the lower half of the paper plate.

Step 8: Add the Facial Features
Use a white paint pen to draw a smile and two nostrils on the muzzle.

Step 9: Finish the Zebra
Draw stripes on the outer edges of the ears with a black marker. Allow everything to dry completely before displaying your paper plate zebra craft.

Why Make Zebra Crafts with Preschoolers?
Zebra crafts give preschoolers a hands-on way to learn about animals while strengthening important developmental skills. As children paint, cut, glue, and assemble their projects, they build fine motor control and hand-eye coordination.
This zoo animal paper plate craft also fits naturally into zoo themes, safari units, and letter Z activities. It provides an opportunity to introduce simple facts about zebras, including where they live, what they eat, and how their distinctive stripes help them stand out in the animal kingdom.
Craft activities like this encourage creativity while helping children make connections between art, literacy, and early science concepts.

Tips for Using This Craft
A little preparation can make this zebra craft even more successful for young learners.
Display finished zebras together. Create a classroom or homeschool wall display to showcase each child’s unique zebra and reinforce the idea that every zebra’s stripes are different.
Pre-cut the pieces for younger children. Preschoolers who are still developing scissor skills may find it easier to focus on painting, gluing, and decorating the zebra.
Talk about zebra stripes. Explain that no two zebras have exactly the same stripe pattern. Encourage children to create their own unique designs.
Pair the craft with a book. Read a nonfiction book about zebras or zoo animals before making the craft to build background knowledge and vocabulary.
Use it in themed lessons. This activity works well with zoo themes, safari units, African animal studies, and letter Z lessons.

More Ways to Enjoy This Craft
Turn this paper plate craft into a complete learning experience with these simple extension activities.
Count the Stripes
Invite children to count the stripes on their zebra and compare their totals with friends or siblings. This simple activity helps build counting and number recognition skills.
Create Stripe Patterns
Talk about the black-and-white pattern on a zebra’s coat. Then challenge children to make their own patterns using blocks, beads, stickers, or colored paper strips.
Sort Zoo Animals
Gather pictures or toy animals and sort them into groups. Children can classify animals by habitat, body covering, number of legs, or whether they belong in a zoo or on a farm.
Compare Animal Sizes
Ask children to compare zebras to other animals they know. Which animals are larger? Which are smaller? This introduces early measurement and comparison concepts.
Practice Letter Z Recognition
Use the craft as part of a letter Z lesson. Have children trace, build, or identify the letter Z while discussing words that begin with the same sound, such as zebra, zip, and zoo.

Grab the Zebra Template
Make this paper plate zebra craft even easier with our free zebra template. Simply print the template, cut out the pieces, and use them to create your own adorable zebra craft.
Click below to get your free zebra template.

This paper plate zebra craft is a simple way to combine creativity, fine motor practice, and animal learning in one hands-on activity. Whether you’re exploring a zoo theme, teaching the letter Z, or learning about African animals, this easy craft is a fun addition to your preschool plans.
Don’t forget to download the free zebra template to make preparation even easier. Then gather your supplies and create your own striped zebra masterpiece!
Paper Plate Zebra Craft
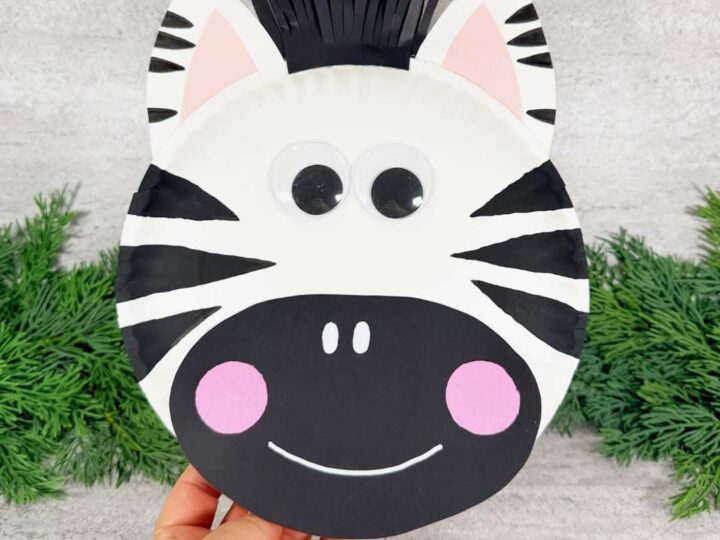
Create an adorable zebra face from a paper plate while preschoolers practice cutting, gluing, painting, and fine motor skills.
Materials
- Paper plate
- Black paint
- Paintbrush
- Black construction paper
- White cardstock
- Pink construction paper
- Googly eyes
- Scissors
- Glue
- Black marker
Tools
Instructions
- Print and cut out the zebra template pieces.
- Trace the stripes onto the paper plate and paint them black.
- Trace and cut the ears, mane, and muzzle from cardstock.
- Fringe the mane and glue the ears and mane to the paper plate.
- Attach the googly eyes and glue the muzzle to the bottom of the plate.
- Add pink cheeks, then draw the nostrils, smile, and ear stripes to finish your zebra.

Tara is the brains behind Homeschool Preschool, where her journey from preschool and public school teacher to homeschooling mom of three fuels her passion for early childhood education. With a blend of expertise and firsthand experience, Tara’s writings offer practical tips and engaging resources to support families in creating meaningful learning adventures at home.


