Tissue Paper Pumpkin Decorating Idea

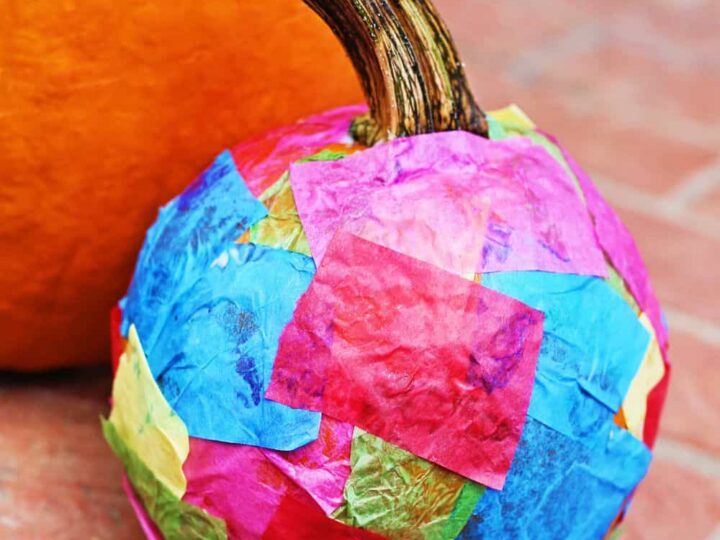
This tissue paper pumpkin decorating idea is a no-carve craft where children cover a real pumpkin with colorful tissue paper squares and school glue. It is perfect for preschoolers ages 3 to 5 and works well as a fall classroom activity or a quick craft at home.
Low-prep and mess-friendly, it is one of those pumpkin activities for preschoolers that is easy to set up for a group. Children can complete this project in about 20 to 30 minutes while strengthening fine motor skills and creating bright decorations for your home or classroom.

How to Decorate a Pumpkin with Tissue Paper
Cut tissue paper into small squares. Apply school glue directly to the pumpkin’s surface. Press tissue paper squares onto the glue, overlapping colors to create a patchwork effect. Continue until the pumpkin is covered. Let it dry completely. This activity requires no carving, uses basic supplies, and works well for preschool-age children.
What You Need
| Supply | Notes |
|---|---|
| Small pie pumpkin | Any small, firm pumpkin works |
| Tissue paper | Multiple colors create a bright patchwork effect |
| Scissors | Kid-safe scissors for pre-cutting squares |
| School glue | Liquid glue works better than a glue stick |
| Paintbrush or sponge brush | Optional, for spreading glue |

Step-by-Step Instructions
Step 1: Cut the tissue paper. Cut tissue paper into small squares. Adults can pre-cut these ahead of time to keep the activity moving for younger preschoolers.

Step 2: Apply glue to the pumpkin. Apply school glue directly onto a small section of the pumpkin’s surface. Use fingers or a brush to spread it evenly.
Step 3: Press on the tissue paper. Place a tissue paper square onto the glue and gently press it down. Smooth out any large wrinkles as you go.

Step 4: Continue covering the pumpkin. Keep adding glue and tissue paper squares, working in small sections. Overlap different colors as you go to build up the patchwork effect.

Step 5: Let it dry. Set the pumpkin aside and let it dry completely before handling or displaying it.

A Few Tips…
⭐ Pre-cut tissue paper squares to about 2 to 3 inches before the activity starts. This keeps things moving and lets children focus on decorating.
⭐ Work in small sections when applying glue. The glue dries quickly, and smaller sections are easier for preschoolers to manage.
⭐ Encourage children to overlap different colors. Where colors layer on top of each other, they blend slightly, making it a natural opportunity to talk about color mixing.
Why Preschoolers Love This Activity
This tissue paper pumpkin craft is hands-on from start to finish. Children get to touch, tear, and press materials, which makes it engaging for sensory-seeking learners. The repetitive motion of applying squares builds fine motor strength and hand-eye coordination. Because there is no wrong way to place the tissue paper, every child ends up with a finished pumpkin they are proud to take home or display in the classroom.
More Pumpkin Activities for Preschool
If your preschoolers enjoyed this craft, here are more pumpkin activities for preschool to keep the fall fun going.
- Preschool Arts and Crafts with Fall Leaves
- Pumpkin Paper Plate Craft
- Pumpkin Sensory Bin {Free Printable Instructions}
- Homemade Pumpkin Spice Playdough
- Pumpkin Soup Sensory Bin

This tissue paper pumpkin decorating idea is a simple, low-prep craft that preschoolers can complete with minimal adult help. It works well as a fall classroom activity or a fun project at home. Set out the supplies, let children decorate at their own pace, and enjoy the bright, colorful results.
Tissue Paper Pumpkin Decorating
Learn how to decorate a pumpkin with tissue paper using school glue and colorful squares. This simple no-carve pumpkin activity is perfect for preschoolers ages 3 to 5 and takes about 20 to 30 minutes to complete.
Materials
- Small pie pumpkin
- Tissue paper in multiple colors
- Scissors
- School glue
- Paintbrush or sponge brush (optional)
Instructions
- Cut tissue paper into small squares, approximately 2 to 3 inches.
- Apply school glue directly onto a small section of the pumpkin's surface.
- Press a tissue paper square onto the glue and gently smooth it down.
- Continue adding glue and tissue paper squares, working in small sections.
- Overlap different colors to create a patchwork effect.
- Let the pumpkin dry completely before handling or displaying.

Tara is the brains behind Homeschool Preschool, where her journey from preschool and public school teacher to homeschooling mom of three fuels her passion for early childhood education. With a blend of expertise and firsthand experience, Tara’s writings offer practical tips and engaging resources to support families in creating meaningful learning adventures at home.


